So you've laid the foundations for the project by creating the route folder and naming the game but what about characters? Characters are the driving force of the game, their experiences, actions, victories and mistakes are what drives an RPG therefore it's important to think about characters carefully when creating them. RPG Maker XP's database allows you to configure your character's appearance, attributes and personal information. Here's how...
First, open the database by clicking the 'Database' icon in the toolbar which opens the 'Database' window. Which should look like this...
To create main characters or 'actors' as they are known in RPG Maker XP, you must have the actors menu open, accessed by clicking the 'Actors' tab at the top left of the database. The image below shows the database screen broken down into it's various sections.
1. Actors Overview
This is a list of all of your actors, RPG Maker XP gives you 8 default characters but you can delete these and add your own. Clicking on an actor name will open the information about the selected actor.
2. Change Maximum If you want more than 8 actors, you can simply click on this box and make the number higher. This number will be the amount of actors you can create. The minimum is 1 and the maximum is 999.
3. Actor Name This is the name that the actor will be referred to during battles, you can either choose a default name or allow the player to choose a name for the character using the events, this will be explained a little later.
4. Actor Class Actors are broken down into classes. Their class determines the equipment they can use, the magic that becomes available to them and their behaviour on the battlefield.
5. Actor Level This is broken down into two numbers. The first being the 'initial level', in other words, this is the level the character will start the game at. This is important because any characters that do not start at the beginning of the game will have to be set at the same sort of level that the other characters would have achieved. Failure to do so can make the game very difficult for the player. The second figure is the 'maximum level'. This simply sets the highest level that the actor can achieve.
6. Actor Experience Curve The experience curve is a tool that allows the user to define the growth of the actor. The image below shows the menu that will appear. It looks very daunting but the two numbers at the bottom are the only important parts of this menu. The 'basis' number is initial amount of experience that is required to reach level one. In the game itself, the figure isn't very practical as the character begins the game at least at level 1. This figure is important however when coupled with the 'inflation' number. This is the percentage increase of the experience required to move onto the next level. In other words, my current inflation is 35%, this means that every level up will require 35% more experience to achieve than the previous one. Put simply, it makes the levelling up system progressive, the higher the next level, the harder it is to achieve. To make the levelling up easier, simply lower the inflation and to make it harder, simply make it higher.
 7. Character Graphic
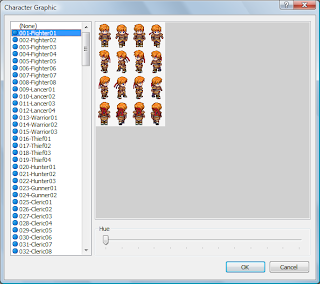
By double clicking on the character image, you can choose the specific graphic that you want the character to look like. The character graphic menu looks like this.
Scrolling down the left hand column shows all of the graphics available to you. There are 200 RTP graphics available that come in all shaps and sizes. Not all of them are characters but all of them will come in handy. The image on the right hand side of the column is a preview of what the character will look like from each angle. In RPG Maker XP it is possible to change the colour of the character, this is done by changing the 'hue' which is found at the bottom of the menu. By moving the slider the hue will change allowing for some unique looking characters and objects. When you're happy with your choice, simply click ok.
  8. Battler Graphic
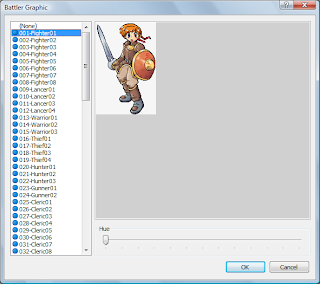
The battler graphic is the image that will represent the character during battles and in some of the menu screens. Selecting a battler is similar to selecting the character graphic. By double clicking on the image, this menu will appear.
Once again, the left hand scroll box contains the many different graphics available to you. There are 100 different default graphics that all correspond to the various character graphics available. The file names for both images are usually the same so just look for matching names to find the battler for the character. The image to the right of the scroll box is a preview of the selected battler and you can also change the hue of the battlers using the slider at the bottom of the screen just like the character selection menu. When you're happy with the selection, click OK.
9. Parameters
Parameters are the various stats that define how powerful the actor is in battle. The parameters are broken down into 6 different groups. HP, SP, Strength, Dexterity, Agility and Intelligence.
 HP: Stands for health points and defines how much damage a character can take before being knocked out of the battle.
SP: Stands for skill points and is used to cast skills. Each skill has a different SP requirement and when the character's SP is depleted they can no longer cast any skills.
Strength: A character's strength defines how much damage the character does with their physical attacks, the higher the strength, the more damage inflicted on the enemy.
 HP: Stands for health points and defines how much damage a character can take before being knocked out of the battle.
 SP: Stands for skill points and is used to cast skills. Each skill has a different SP requirement and when the character's SP is depleted they can no longer cast any skills.
Strength: A character's strength defines how much damage the character does with their physical attacks, the higher the strength, the more damage inflicted on the enemy.
Dexterity: A character's dexterity defines the hit rate of their physical attacks. Simply put, the higher the dexterity figure, the more likely it is that a character's physical attack will hit and not miss the enemy.
Agility: A character's agility will define the evade rate of physical attacks. In other words, a character with a higher agility figure will dodge an enemy's physical attacks more often than a character with a lower agility figure.
Intelligence: Intelligence defines the strength of magical attacks cast by the character. If a character has a higher intelligence figure, then their magical attacks will inflict more damage points.
By double clicking on any of the parameter curves, you will open this menu. The tabs at the top allow you to move between menu's for each of the different parameters.There are various ways to change the parameter curve for your character. The first and most simple is by drawing a new curve where the old one is. Simply hold down the left-mouse button and draw a line from the left of the curve to the right, this will then define a new curve as you have drawn it. The next is using 'quick settings'. By choosing one of the letters
at the top of the menu under the 'Quick Setting' heading, you can change the parameters quickly using pre-programmed curves. The final, way is by entering the parameter figure you want to correspond to specific levels.
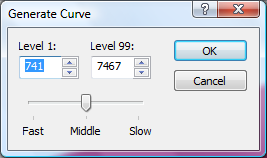
 Start by clicking on 'Generate Curve...' which will bring up this menu...
 Start by clicking on 'Generate Curve...' which will bring up this menu...
As you can see, this menu has a value for Level 1 and a value for Level 99, as you might have guessed these are the extremities (the most and least) level-wise that a character can achieve. When RPG Maker XP knows these values, it is able to generate a curve that will begin at the level 1 value and end at the level 99. The curviture is modified by using the slider found at the bottom of the menu. A middle curve will be completely straight, as the growth of the parameter is balanced the whole way through the growth of the character. If you choose a faster growth pattern, the curve will be steep initially but then begin to level out at later levels. A slower growth pattern will see little increase in stats during early levels but later levels will see a far larger increase. The image below shows how the curves will change depending on the growth pattern. Using the tabs at the top of the menu, you can change the stats for all parameters in whatever way you choose.
10. Starting Equipment
The actor's starting equipment is the equipment that the character will begin the game with. By simply using the drop down menu's, you can select initial equipment and if you wish it, you can fix the equipment (so it can't be removed or changed) to the actor by clicking the 'fixed' box found to the right of the drop down menu.
By customising each of these different aspects of your character, you can make a collection of completely unique characters that complement each other in different ways.


No comments:
Post a Comment